nano blockla

#!/bin/bash
iptables -A INPUT -s $1 -j DROP
iptables-save > /etc/sysconfig/iptables

ctrl+x y

chmod +x blokla

./blokla ip veya subnet

iptables -L

te amk bebe seyleriyle ugrasiyoz.Kategori: Kategorisiz Yazilar
Hic bir kategoriye girmeyen yazilarimi buraya yazacagim..
~/.ssh/config
Host serverName
    HostName 192.168.1.123
    User userOnServer
    Port 22
    IdentityFile ~/path/to/key
imap rsync between directadmin servers
1- login to old server containing data
2- cd /home
ls -1
cp to a text file
delete unwanted users in that file
3- login to new server
ssh-copy-id root@old.ser.ver.ip
nano list.txt
enter user list one in a line
4- nano imap-sync
for E in `cat list.txt`; do rsync -ave 'ssh -p 22' 37.247.xx.xx:/home/$E/imap/ /home/$E/imap/ ; done
sh imap-sync
5- cd /usr/local/directadmin/scripts
./set_permissions.sh all
done!
directadmin php 8x e gecerken sorunlar ve cozumler
directadmin php 8.x gecerken sorunlar oluyo bazi libraryler bulunamadi guncellenemedi falan ve derlenmiyor ise php asagidaki yontemler ise yariyor
kurulu bulunan ancak kullanilmayan ivir ziviri kaldirma ve sistemi guncellemeye uygun hale getirme
cd /usr/local/directadmin/custombuild
./build update
./build list_removals
./build remove_items
sonrasinda ekrani takip et
mesela libiconv icin bu gerekiyor
./build remove_old_local libiconv
ayni sekilde butun php leri derlemektense sadece 1 php yi derlemek icin
./build php_expert 8.2 php-fpm
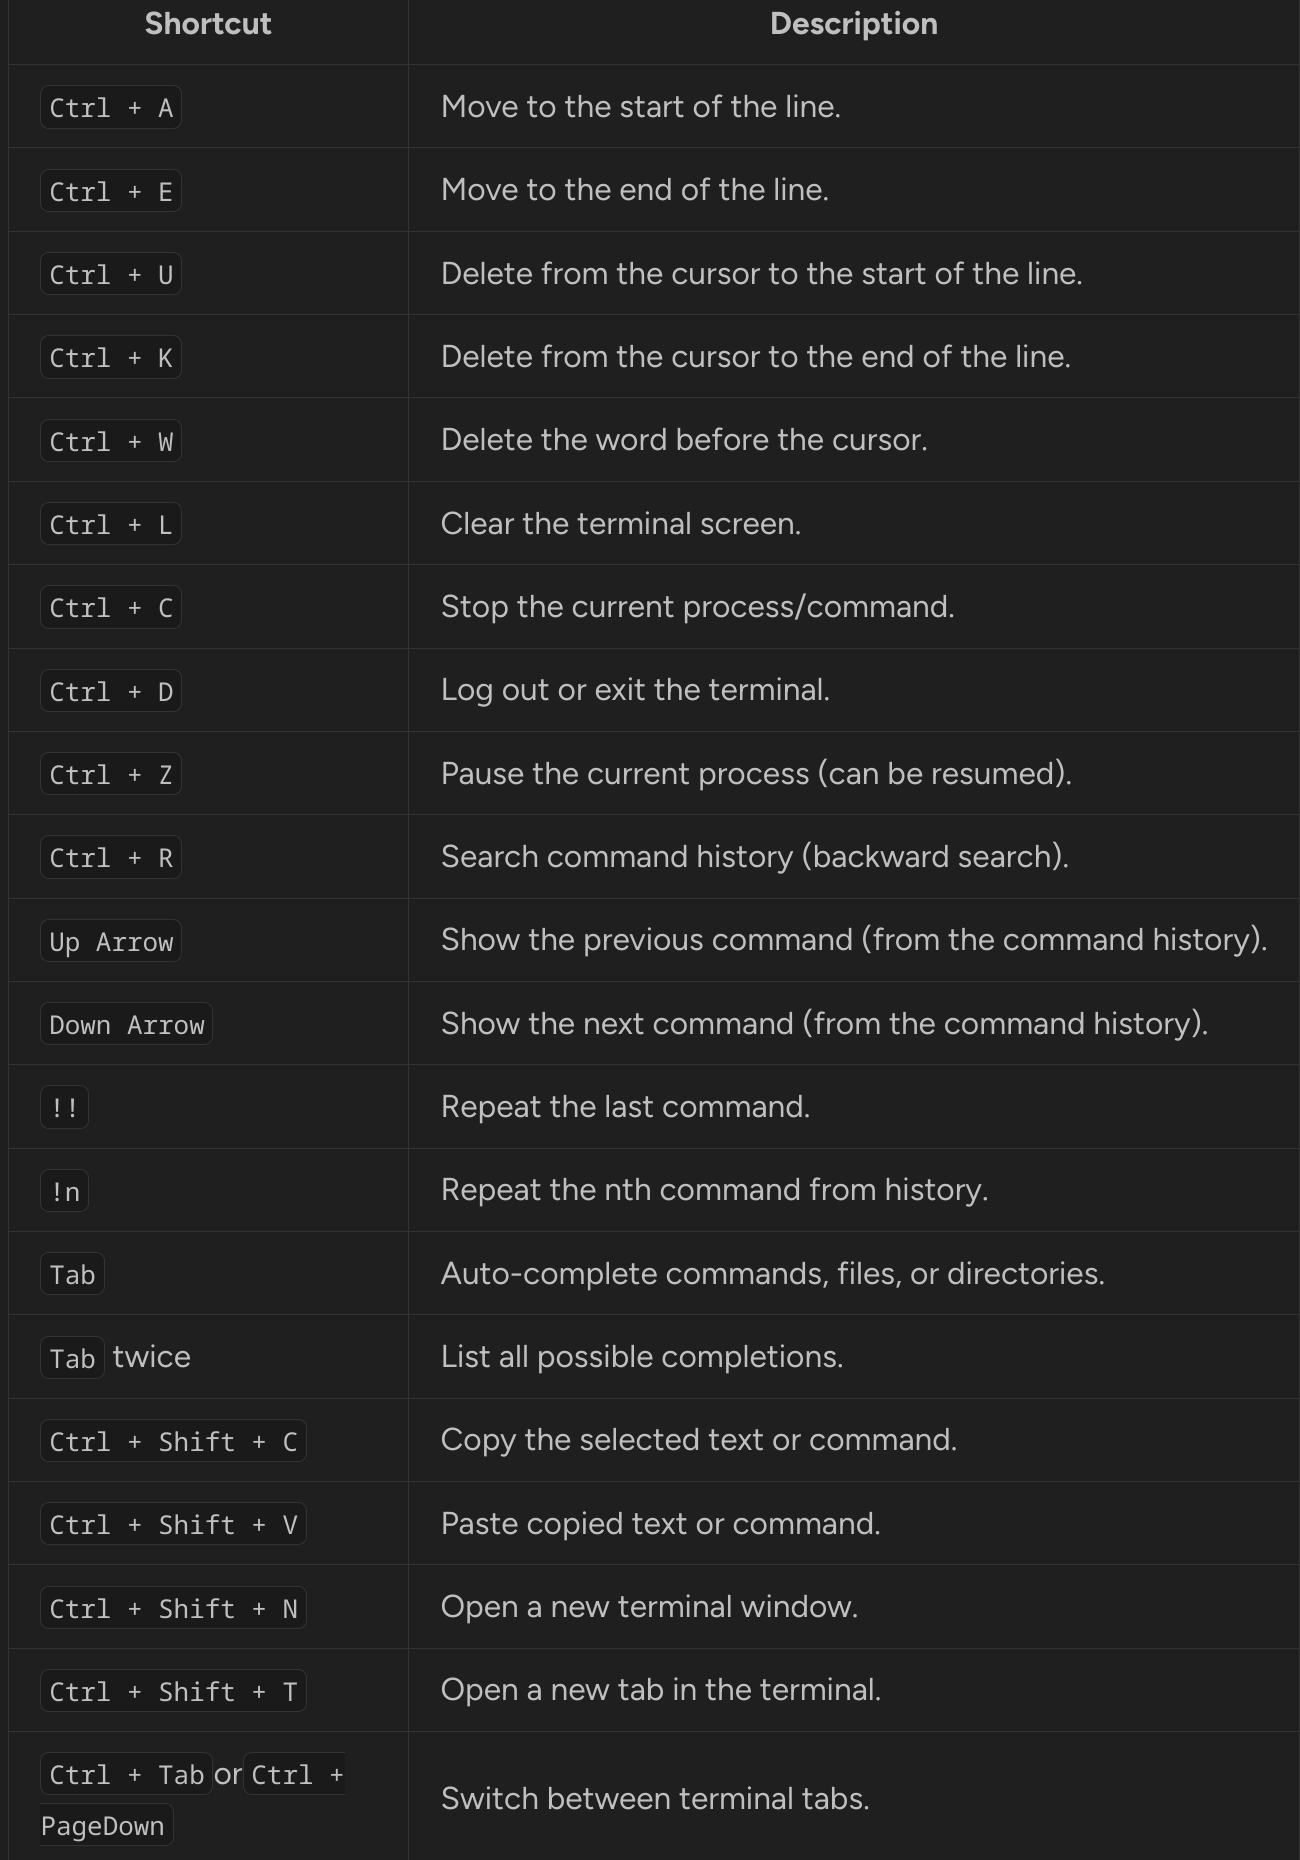
mesela cok guzel olacaktir.21 Useful Terminal Shortcuts Pro Linux Users Love to Use
Terminal shortcuts!
Shortcut Description
Ctrl + A Move to the start of the line.
Ctrl + E Move to the end of the line.
Ctrl + U Delete from the cursor to the start of the line.
Ctrl + K Delete from the cursor to the end of the line.
Ctrl + W Delete the word before the cursor.
Ctrl + L Clear the terminal screen.
Ctrl + C Stop the current process/command.
Ctrl + D Log out or exit the terminal.
Ctrl + Z Pause the current process (can be resumed).
Ctrl + R Search command history (backward search).
Up Arrow Show the previous command (from the command history).
Down Arrow Show the next command (from the command history).
!! Repeat the last command.
!n Repeat the nth command from history.
Tab Auto-complete commands, files, or directories.
Tab twice List all possible completions.
Ctrl + Shift + C Copy the selected text or command.
Ctrl + Shift + V Paste copied text or command.
Ctrl + Shift + N Open a new terminal window.
Ctrl + Shift + T Open a new tab in the terminal.
Ctrl + TaborCtrl + PageDown Switch between terminal tabs.
Google chrome broken after update
Turn off GPU acceleration. run this command google-chrome-stable --disable-gpu --disable-accelerated-video-encodebonus – cpanel to directadmin convert , backup , move …
for E in `ls -1`; do /usr/local/directadmin/shared/cpanel_to_da/cpanel_to_da.sh /home/admin/admin_backups/3/$E /home/admin/admin_backups/3/da/ ; done
linux list and sort all files in directory and subdirectories by size
du -ah . | grep -v "/$" | sort -rh | morecentos 7 ca expired?
t’s likely an old CA cert bundle on the system. Try the following to fix it:
Code:
curl -k -o /etc/ssl/certs/ISRG_Root_X1.pem https://letsencrypt.org/certs/isrgrootx1.pem
service directadmin restart
manjaro / arch linux BTRFS chroot grub install story.
[manjaro@manjaro-cinnamon ~]$ sudo pacman -Sy arch-install-scripts
:: Synchronizing package databases...
 core                  163.9 KiB   303 KiB/s 00:01 [######################] 100%
 extra                          1865.8 KiB  2.29 MiB/s 00:01 [################################] 100%
 community                         7.5 MiB  5.84 MiB/s 00:01 [################################] 100%
 multilib                        169.3 KiB  1411 KiB/s 00:00 [################################] 100%
error: failed retrieving file 'core.db' from kambing.ui.ac.id : Failed to connect to kambing.ui.ac.id port 80 after 5212 ms: Connection timed out
error: failed retrieving file 'core.db' from ftp.cuhk.edu.hk : Failed to connect to ftp.cuhk.edu.hk port 80 after 5210 ms: Connection timed out
error: failed retrieving file 'extra.db' from kambing.ui.ac.id : Failed to connect to kambing.ui.ac.id port 80 after 5202 ms: Connection timed out
error: failed retrieving file 'extra.db' from ftp.cuhk.edu.hk : Failed to connect to ftp.cuhk.edu.hk port 80 after 5201 ms: Connection timed out
error: failed retrieving file 'community.db' from kambing.ui.ac.id : Failed to connect to kambing.ui.ac.id port 80 after 5201 ms: Connection timed out
warning: too many errors from kambing.ui.ac.id, skipping for the remainder of this transaction
error: failed retrieving file 'community.db' from ftp.cuhk.edu.hk : Failed to connect to ftp.cuhk.edu.hk port 80 after 5202 ms: Connection timed out
warning: too many errors from ftp.cuhk.edu.hk, skipping for the remainder of this transaction
:: Some packages should be upgraded first...
resolving dependencies...
looking for conflicting packages...

Packages (2) archlinux-keyring-20221123-1  manjaro-keyring-20221028-4

Total Download Size:   1.64 MiB
Total Installed Size:  2.28 MiB
Net Upgrade Size:      0.02 MiB

:: Proceed with installation? [Y/n] y
:: Retrieving packages...
 archlinux-keyring-20221123...  1140.5 KiB  2.46 MiB/s 00:00 [################################] 100%
 manjaro-keyring-20221028-4-any  541.6 KiB  6.96 MiB/s 00:00 [################################] 100%
 Total (2/2)                    1682.2 KiB  2.49 MiB/s 00:01 [################################] 100%
(2/2) checking keys in keyring                               [################################] 100%
(2/2) checking package integrity                             [################################] 100%
(2/2) loading package files                                  [################################] 100%
(2/2) checking for file conflicts                            [################################] 100%
(2/2) checking available disk space                          [################################] 100%
:: Processing package changes...
(1/2) upgrading archlinux-keyring                            [################################] 100%
==> Appending keys from archlinux.gpg...
==> Locally signing trusted keys in keyring...
  -> Locally signed 1 keys.
==> Importing owner trust values...
gpg: inserting ownertrust of 4
==> Disabling revoked keys in keyring...
  -> Disabled 2 keys.
==> Updating trust database...
gpg: marginals needed: 3  completes needed: 1  trust model: pgp
gpg: depth: 0  valid:   1  signed:  20  trust: 0-, 0q, 0n, 0m, 0f, 1u
gpg: depth: 1  valid:  20  signed:  94  trust: 0-, 0q, 0n, 20m, 0f, 0u
gpg: depth: 2  valid:  74  signed:  28  trust: 74-, 0q, 0n, 0m, 0f, 0u
gpg: next trustdb check due at 2023-01-01
==> Updating trust database...
gpg: next trustdb check due at 2023-01-01
==> Delete expired Build-Server Key
==> Updating trust database...
gpg: marginals needed: 3  completes needed: 1  trust model: pgp
gpg: depth: 0  valid:   1  signed:  20  trust: 0-, 0q, 0n, 0m, 0f, 1u
gpg: depth: 1  valid:  20  signed:  94  trust: 0-, 0q, 0n, 20m, 0f, 0u
gpg: depth: 2  valid:  74  signed:  28  trust: 74-, 0q, 0n, 0m, 0f, 0u
gpg: next trustdb check due at 2023-01-01
(2/2) upgrading manjaro-keyring                              [################################] 100%
==> Appending keys from manjaro.gpg...
==> Locally signing trusted keys in keyring...
  -> Locally signed 4 keys.
==> Importing owner trust values...
gpg: setting ownertrust to 4
gpg: setting ownertrust to 4
==> Updating trust database...
gpg: marginals needed: 3  completes needed: 1  trust model: pgp
gpg: depth: 0  valid:   1  signed:  22  trust: 0-, 0q, 0n, 0m, 0f, 1u
gpg: depth: 1  valid:  22  signed:  94  trust: 0-, 0q, 0n, 22m, 0f, 0u
gpg: depth: 2  valid:  74  signed:  28  trust: 74-, 0q, 0n, 0m, 0f, 0u
gpg: next trustdb check due at 2023-01-01
:: Running post-transaction hooks...
(1/2) Reloading system manager configuration...
(2/2) Arming ConditionNeedsUpdate...

resolving dependencies...
looking for conflicting packages...

Packages (1) arch-install-scripts-28-1

Total Download Size:   0.02 MiB
Total Installed Size:  0.05 MiB

:: Proceed with installation? [Y/n]
:: Retrieving packages...
 arch-install-scripts-28-1-any    15.8 KiB  42.3 KiB/s 00:00 [################################] 100%
error: failed retrieving file 'arch-install-scripts-28-1-any.pkg.tar.zst' from kambing.ui.ac.id : Failed to connect to kambing.ui.ac.id port 80 after 6160 ms: Connection timed out
error: failed retrieving file 'arch-install-scripts-28-1-any.pkg.tar.zst' from ftp.cuhk.edu.hk : Failed to connect to ftp.cuhk.edu.hk port 80 after 5212 ms: Connection timed out
(1/1) checking keys in keyring                               [################################] 100%
(1/1) checking package integrity                             [################################] 100%
(1/1) loading package files                                  [################################] 100%
(1/1) checking for file conflicts                            [################################] 100%
(1/1) checking available disk space                          [################################] 100%
:: Processing package changes...
(1/1) installing arch-install-scripts                        [################################] 100%
:: Running post-transaction hooks...
(1/1) Arming ConditionNeedsUpdate...
[manjaro@manjaro-cinnamon ~]$ sudo lsblk -f
NAME FSTYPE FSVER LABEL         UUID                                 FSAVAIL FSUSE% MOUNTPOINTS
loop0
     squash 4.0                                                            0   100% /run/miso/sfs/livefs
loop1
     squash 4.0                                                            0   100% /run/miso/sfs/mhwdfs
loop2
     squash 4.0                                                            0   100% /run/miso/sfs/desktopfs
loop3
     squash 4.0                                                            0   100% /run/miso/sfs/rootfs
sda
└─sda1
     ext4   1.0   10tb1         d59252fa-9b89-42c4-b966-5606a6f02b89    8.2T     4% /run/media/manjaro/10tb1
sdb
└─sdb1
     ext4   1.0   10tb2         47a23e21-ec2f-4f79-b1e2-0d6d62c0c8ef  355.9G    91% /run/media/manjaro/10tb2
sdc
└─sdc1
     ext4   1.0   10tb3         0ea2653e-5cb2-4f29-8904-c45c525961af  751.8G    87% /run/media/manjaro/10tb3
sdd
└─sdd1
     ext4   1.0   EVO860-2      f12442dd-5018-45db-9523-d92a857bf6b1
sde
└─sde1
     ext4   1.0   EVO860-1      ddb9d9b0-c043-4162-8607-28d0cfbf199f
sdf  iso966 Jolie MANJARO_CINNAMON_2137
                                2022-08-26-08-40-30-00                     0   100% /run/miso/bootmnt
├─sdf1
│    iso966 Jolie MANJARO_CINNAMON_2137
│                               2022-08-26-08-40-30-00
└─sdf2
     vfat   FAT12 MISO_EFI      2664-DC36
nvme1n1

├─nvme1n1p1
│    vfat   FAT32               3C81-0B10
├─nvme1n1p2
│
├─nvme1n1p3
│    ntfs                       429481D89481CF3B
└─nvme1n1p4
     ntfs                       DC76D99C76D9782A
nvme0n1

├─nvme0n1p1
│    vfat   FAT32 NO_LABEL      D380-908E
└─nvme0n1p2
     btrfs                      aca29224-1164-4d3f-807c-170e5a9174f2
[manjaro@manjaro-cinnamon ~]$ sudo mount -o subvol=@ /dev/nvme0n1p2 /mnt
[manjaro@manjaro-cinnamon ~]$ sudo mount -o subvol=@log /dev/nvme0n1p2 /mnt/var/log
[manjaro@manjaro-cinnamon ~]$ sudo mount -o subvol=@cache /dev/nvme0n1p2 /mnt/var/cache
[manjaro@manjaro-cinnamon ~]$ sudo mount -o subvol=@home /dev/nvme0n1p2 /mnt/home
[manjaro@manjaro-cinnamon ~]$ sudo mount /dev/nvme0n1p1 /mnt/boot/efi
[manjaro@manjaro-cinnamon ~]$
[manjaro@manjaro-cinnamon ~]$
[manjaro@manjaro-cinnamon ~]$ arch
arch-chroot                 archlinux-java              archlinux-keyring-wkd-sync
[manjaro@manjaro-cinnamon ~]$ arch-chroot /mnt
==> ERROR: This script must be run with root privileges
[manjaro@manjaro-cinnamon ~]$ sudo arch-chroot /mnt
[manjaro-cinnamon /]# sudo arch-chroot /mnt
Installing for x86_64-efi platform.
Installation finished. No error reported.
[manjaro-cinnamon /]#
Summary:
Whenever I did a BIOS update my manjaro cinnamon installation which boots in UEFI mode and which also happens to be a BTRFS installation fucks up and never boots again , because by somehow my fucking BIOS can not find the UEFI boot entry again.
So what I do do fix this problem:
1- create a bootable manjaro cinnamon usb using etcher.
2- boot from this usb into manjaro cinnamon live using UEFI (important)
3- then appy these commands: ( details above)
sudo pacman -Sy arch-install-scripts
sudo lsblk -f
sudo mount -o subvol=@ /dev/nvme0n1p2 /mnt
sudo mount -o subvol=@log /dev/nvme0n1p2 /mnt/var/log
sudo mount -o subvol=@cache /dev/nvme0n1p2 /mnt/var/cache
sudo mount -o subvol=@home /dev/nvme0n1p2 /mnt/home
sudo mount /dev/nvme0n1p1 /mnt/boot/efi
sudo arch-chroot /mnt
grub-install
exit chroot , reboot , set BIOS UEFI boot entry to “manjaro” again and boot….
important notes: For this to work you MUST first boot into Live USB environment using UEFI boot. Otherwise you can not chroot and write grub to /boot/efi