Options +FollowSymlinks
RewriteEngine on
rewritecond %{http_host} ^domain.com [nc]
rewriterule ^(.*)$ http://www.domain.com/$1 [r=301,nc]
bu ornekte
siteye domain.com olarak girenleri www.domain.com a yonlendirdik
Hic bir kategoriye girmeyen yazilarimi buraya yazacagim..
Options +FollowSymlinks
RewriteEngine on
rewritecond %{http_host} ^domain.com [nc]
rewriterule ^(.*)$ http://www.domain.com/$1 [r=301,nc]
bu ornekte
siteye domain.com olarak girenleri www.domain.com a yonlendirdik
root@yedek:~# cat /etc/debian_version
6.0.3
debian kurduk standart br sekilde lvm ile
daha sonra lvm mizi yeni diskler ekleyerek buyuttuk
legacy grub lvmyi sikine takmasada kullandigim grub2 default gelen yeni debian ile yeni kernel guncellemesinde sicti.
neden
cunku grub2 lvm de ne oluyor bitiyor onemsiyor.
benim icin acil cozum gerekli idi
su sekilde yaptim
1- aptitude purge grub
2- aptitude purge grub-common (30 tane sey sorcak he de gec)
3- aptitude install grub-pc (grub2 paketi bu olsa gerek)
bunlari yapamadi gene hata verdi
cunku disk uid leri ile ilgili bir salaklik vardi
o zaman su komutu calistirdim
#1 | Written by drdrape about 4 months ago.
You can also run
sudo grub-mkdevicemap
which will update /boot/grub/device.map automatically
device mapi guncelledi kendisi
sonra oldu bitti
detayli hata logu ve basima gelende su posttakine benzer bir durumdu.
While installing security updates in a seldomly used virtual machine, the latest kernel package was ready to be configured when I got the following error:
Setting up linux-image-2.6.32-5-amd64 (2.6.32-31) ...
Running depmod.
Running update-initramfs.
update-initramfs: Generating /boot/initrd.img-2.6.32-5-amd64
Examining /etc/kernel/postinst.d.
run-parts: executing /etc/kernel/postinst.d/initramfs-tools 2.6.32-5-amd64 /boot/vmlinuz-2.6.32-5-amd64
run-parts: executing /etc/kernel/postinst.d/zz-update-grub 2.6.32-5-amd64 /boot/vmlinuz-2.6.32-5-amd64
Generating grub.cfg ...
/usr/sbin/grub-probe: error: Couldn't find PV pv1. Check your device.map.
run-parts: /etc/kernel/postinst.d/zz-update-grub exited with return code 1
Failed to process /etc/kernel/postinst.d at /var/lib/dpkg/info/linux-image-2.6.32-5-amd64.postinst line 799.
dpkg: error processing linux-image-2.6.32-5-amd64 (--configure):
subprocess installed post-installation script returned error exit status 2
Errors were encountered while processing:
linux-image-2.6.32-5-amd64
First I didn't quite get the line about "Couldn't find PV pv1. Check your device.map", but after some time it dawned on me that "PV" might mean "physical volume", a term used by LVM. I also remembered that I extended the LVM volume group with an additional block device that I attached to the virtual machine.
If it’s a Linux box
ssh -ND 1234 user@ip
Setup your web browser to SOCKS proxy and localhost:1234
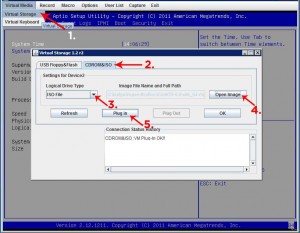
Option 2: Mount your own ISO via KVM virtual media
1. At the top left, choose ‘Virtual Media’ -> ‘Virtual Storage’.
2. Choose the ‘CDROM&ISO’ tab on the dialog box that pops up.
3. Change logical drive type to ‘ISO file’.
4. Press ‘Open Image’ and select the ISO file on your local system.
5. Press ‘Plug In’ and then ‘OK’
Remmina is a remote desktop client written in GTK+, aiming to be useful for system administrators and travellers, who need to work with lots of remote computers in front of either large monitors or tiny netbooks. Remmina supports multiple network protocols in an integrated and consistant user interface. Currently RDP, VNC, NX, XDMCP and SSH are supported.
Remmina is released in separated source packages:
“remmina”, the main GTK+ application
“remmina-plugins”, a set of plugins
Remmina is free and open-source software, released under GNU GPL license.
http://remmina.sourceforge.net/
proxmox uzerinde kvm qemu ile
virtio disk ve network driverlarini kullanarak centos makinasi kurduk
kurulumdan sonra
cat /proc/cpuinfo dedigimizde Qemu Virtual CPU yaziyor
uygulamalar begenmeyip tiri viri yapiyorsa, su sekilde yapacagiz
vm noduna login ettikten sonra
nano /etc/qemu-server/VMID.conf
an alta ekle
args: -cpu host
VM yi stop et , start et , reboot is gormez
artik sanal makinamiz host node cpu sunu gorecek
cat /proc/cpuinfo
original: http://pingbin.com/2011/07/view-the-routing-cache-and-hits/
Most of us check the normal thinks like traceroute or arp on a web server, but actually checking recent routing table lookup’s can be a great tool. Doing this you can see if your actually using the right interface or if the application is even requesting the traffic to be routed by your OS.
When debugging a networking issue it can be invaluable to see your linux servers current routes to get an idea of what’s going on, also you can view the number of hits these routes have recently gotten, just look in the use column of the output table.
1
|
route -neeC |
You should see something like the following output:
1
2
3
4
5
6
7
8
|
root@:/ # route -neeC Kernel IP routing cache Source Destination Gateway Flags Metric Ref Use Iface MSS Window irtt TOS HHRef HHUptod SpecDst 78.46.172.35 208.43.68.59 192.0.2.1 0 0 2 venet0 1500 0 800 0 -1 0 78.46.172.35 67.228.213.178 78.46.172.35 78.46.172.35 l 0 0 23 lo 0 0 0 0 -1 0 78.46.172.35 78.46.172.35 72.46.130.42 192.0.2.1 0 0 1 venet0 1500 0 875 0 -1 0 78.46.172.35 82.103.128.63 78.46.172.35 78.46.172.35 l 0 0 23 lo 0 0 0 0 -1 0 78.46.172.35 78.46.172.35 174.34.156.130 192.0.2.1 0 0 1 venet0 1500 0 735 0 -1 0 78.46.172.35 |
From the above we can see some very interesting stats such as the interface used, source and destination IP’s, metric, number of ‘uses’ and even the interface MTU
original: http://pingbin.com/2011/07/irc-bouncer-keep-connected-and-history/
IRC is still actually quite popular, albeit with the more technical community. However there are some issues with it, most significantly it’s design doesn’t really allow for the mobility of it’s users from one workstation to another which is fairly common practice in a technical community. History is created in realtime without been stored on the server for user retrieval, much like a real world conversation if your not there then you miss what has been said and you can only gain back that history by asking someone what happend (which isn’t going to be that accurate).
Adapting this design requires a middle man of sorts, in this case a VPS server or even a dedicated server if you have one. Basically you install some software on a server, this software connects to the IRC server on your behalf and constantly maintains the session. You keep the same username/handel/nic and ‘session’ with 100% presence in the channel, therefore you also get 100% of the history on the middel man VPS.
As a client from your workstation you then make an IRC connection not to the main IRC server, but your middle man IRC server. This server will then instantly push you the historical data so you can jump straight into the conversation. great isn’t it!
First we need to install the software:
1
2
3
|
sudo apt-get install znc sudo adduser znc su znc |
Next you need to follow through the wizard and create a configuration file, the config file will be stored in ~/.znc/configs/znc.conf once created, just run the following command and follow the instructions:
1
|
znc --makeconf |
You will be asked for a port to use, I would suggest using the normal IRC port however if your trying to get around a proxy use something like port 80, only if there is no web server attached!
Finally just setup your IRC client to use the proxy vps as the IRC server either the hostname or IP address should work, also don’t forget to give the user name and password or you will get an authentication error
How to see individual hard drive read/write status?
yum install sysstat
iostat can be useful too, e.g. iostat -dx 5
if you want to see the raw transfer rates rather than the i/o stats, you can do:
iostat -k 10 10
which will update 10 times, once every 10 seconds. I personally prefer iostat -x like gordon recommended, but iostat -k is easier to read the M/s
debian 6 – 64 bit
1- nano /etc/apt/sources.list
deb http://mirror.ovh.net/debian/ squeeze main contrib non-free
deb-src http://mirror.ovh.net/debian/ squeeze contrib main
deb http://security.debian.org/ squeeze/updates main
deb-src http://security.debian.org/ squeeze/updates main
-----
apt-get update
apt-get upgrade
2- apt-get install tightvncserver wine xterm iceweasel vnstat xfce4-goodies xfce4 htop mc flashplugin-nonfree
3-
useradd -m shukko
su - shukko
mkdir .vnc
nano .vnc/xstartup
--
startxfce4
--
chmod +x .vnc/xstartup
vncserver :1 -geometry 1280x800
Gule gule kullan 🙂